Last Friday night I hosted a small dinner party for three of my closest foodie friends. The “theme” of this party was based on a series of culinary classes I had the great fortune to take for my June column for Yellow Scene.
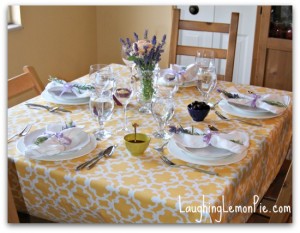
Here’s a photo of the table all laid out and ready to go for my guests.
I was able to take the Cheese 101 course from Cured in Boulder, a course on making pasta and gnocchi from Colterra in Niwot, and chocolate courses from Piece, Love & Chocolate.
So we started the evening with a cheese course.
Tasting
As with any food or drink, you want to use all of your senses when tasting cheese. So you want to:
- LOOK at the rind and the interior, noting the different textures and colors
- TOUCH the cheese to see how hard or soft it is, whether it springs back, whether it crumbles, and if the texture is consistent throughout
- SMELL the cheese, because aroma is a huge component of taste—but remember that the character and intensity of a cheese’s smell don’t necessarily translate to its taste (for example: Limburger is a notoriously stinky cheese, but it actually has a very mild flavor)
- TASTE last by taking a small bite and letting it sit on your tongue for a few moments; roll it around your mouth so that it hits all the areas of your tongue and notice how the flavor changes both as it stays in your mouth, as you chew, and after you swallow
How to Make a Cheese Plate
The Cured staff have a few suggestions for how to make cheese plate that will be as fun to taste with friends as it is to just eat.
- Decide whether you want to do a balanced spectrum, with a variety of types of cheeses, or a mini “seminar” on one type.
- The traditional plate would consist of one soft cheese, one hard cheese, and one blue cheese, but there are a million riffs on this theme.
- A “seminar” type plate might consist of all blue cheeses, all soft cheeses, etc.
- You could also decide to do a comparison: cheeses all from a particular region, an American vs. European taste-off, or a selection of cheese made from different milks (ie: cow, sheep, goat) or from a single kind of milk with different textures.
Once you’ve chosen a theme, a good cheesemonger will be able to help you make specific selections for your cheese plate.
Next, you’ll want to decide on how much to buy. Keep these general guidelines in mind:
- For a full tasting, you want 5-10 cheeses, about 1/2 an ounce of each per person
- For an appetizer or post-entree cheese plate, choose 3–5 cheeses at about 3/4 of an ounce each per person
- If you’re serving cheese as a main course, choose 3–5 cheeses and allow 1 1/4 ounce per person
Cheese Types
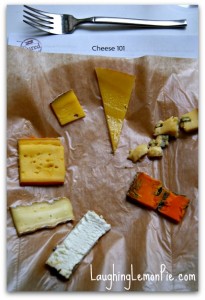
Above is a picture of the cheese plate I was served at my Cheese 101 tasting with the types of the cheeses added. You’ll notice that it goes from soft to hard and then blue and cheddar, starting from the 6 o’clock position and moving clockwise.
Fresh Cheese
Fresh cheeses are quickly ripened and are very young—anywhere from only a few hours to just a few weeks old. They are very soft and include cheeses like farmer’s cheese, ricotta, mozzarella, and fresh chevre.
Bloomy Rind
Also known as a soft ripened cheese, these are formed in a mold and allowed to drain until they can be removed onto a rack. Then the cheesemaker coats them with a bacteria that produces the signature white rind. They’re generally still very young, anywhere from about 2 weeks to a couple of months. These cheeses include Brie, camembert, cremont, Humbolt-Fog, Mt. Tam, and Delice de Bourgogne.
Washed Rind
Washed rind cheeses start out like bloomy rind cheeses, but after they are removed from their mold, they are washed at regular intervals with a brine solution that might be plain salt water, beer, or spirits. These are the famously “stinky” cheeses and can be very polarizing! They include epoisses, munster, grayson, red hawk and appenzeller. This is one of the most creative categories for a cheesemaker.
Uncooked, Pressed
These cheeses are put into their molds and then pressed for an extended period of time; expelling that much whey produces a much firmer cheese. Then they are set aside to age for quite a while. Tomme style cheese generally fall into this category.
Cooked, Pressed
This technique creates the classic hard cheeses like Beaufort, Comte, Gruyere, Rupert, Parmesans, etc. They are cooked a little longer, which creates a firmer curd, then pressed for an extended period of time so that the curds bond tightly and become dense, solid, and a little crumbly.
Blue
Blue cheeses are inoculated with bacteria that give them their distinctive blue/green veins and their tangy taste. If you see long, straight veins in your blue cheese, that is likely where a needle was inserted to allow air to penetrate the cheese to keep the bacteria healthy. Blue cheeses include stilton, roquefort, berkshire blue, and the Dunbarton Blue Cheddar pictured last above.
Cheese and Wine
Pairing cheese with wine is an entirely different subject (one on which Cured offers whole classes!) but one important tip I took away from the Cheese 101 class was a new-to-me varietal that pairs nicely with a cheese plate: Soave. It’s a dry, Italian white wine and I found it was excellent both at the class and at my own table for my dinner party. An easy way to get just one bottle to go with your cheese course.
Storing Cheese
A few final notes on buying and storing cheese. Cheese is a living food, so it’s important to store it properly to keep it healthy and fresh.
- Buy small amounts of cheese frequently; that giant tub of blue cheese from Costco isn’t going to give you the best bang for your buck in this case.
- Wrap cheese in waxed paper and then with plastic wrap or aluminum. The extra layer helps the cheese to “breathe.”
- Once a cheese is cut (from the original wheel) it stops ripening, so shop somewhere you know the cheese is fresh and the turnover is high.
- Especially with soft cheeses, try to eat them within a week of purchasing.
So what other questions do you have about cheese? Let us know!



I have a question. Are all cheese better at room temp, or are there any that are better slightly chilled?
Room temperature is generally best, as far as I know. Cheese that is too cold won’t release all its best flavors.